
pxShot · Screenshot app for Mac
pxShot documentation
How to capture, annotate and find your screenshots with pxShot.
Get started
pxShot is a menu bar app. It has no Dock icon. Click the pxShot icon in the menu bar to see the capture modes, the hub, the cleanup and the settings.
Your first capture
- Click the pxShot icon in the menu bar.
- Click Capture Area, or press ⇧⌘4.
- Drag to select an area. The capture occurs at the release.
pxShot saves the file to the save folder and copies the capture to the clipboard. The clipboard item holds the image, the file and the file path as text. An image app pastes the image, and a terminal pastes the file path.
Screen Recording permission
macOS asks for the Screen Recording permission at the first capture. pxShot cannot capture the screen without it.
- Open System Settings > Privacy & Security > Screen & System Audio Recording.
- Turn on pxShot.
- Quit pxShot and open it again. The permission applies after pxShot starts again.
Capture modes
pxShot has seven capture modes. Start a mode from the menu or with its shortcut.
| Mode | Default shortcut | Operation |
|---|---|---|
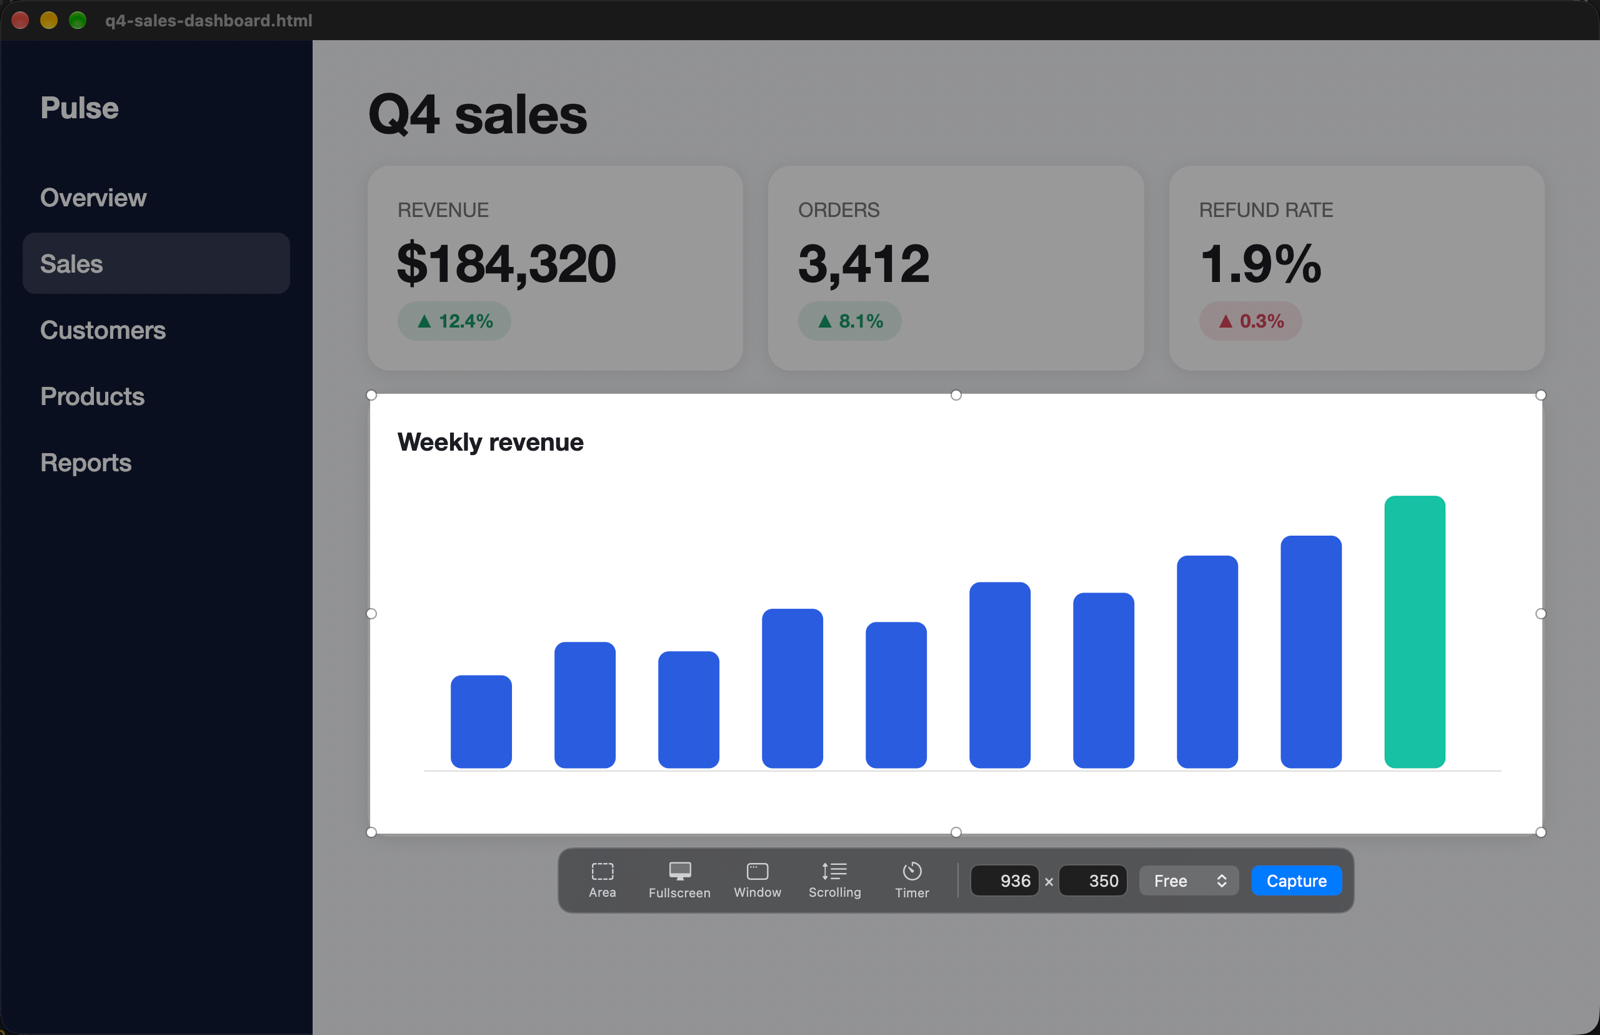
| All-In-One | ⇧⌘5 | Shows the last area with handles and a toolbar. The toolbar starts each mode, sets the size and locks the aspect ratio. |
| Capture Area | ⇧⌘4 | Drag to select. The capture occurs at the release. |
| Capture Previous Area | none | Captures the last area again. |
| Capture Fullscreen | ⇧⌘3 | Captures the display that has the pointer. |
| Capture Window | ⇧⌘6 | Click a window. The shadow and the background follow the settings. |
| Self-Timer | ⇧⌘7 | Select an area. The capture occurs after the countdown. |
| Scrolling Capture | ⇧⌘8 | Select an area, start the capture, then scroll. pxShot makes one long image. |
Shortcuts and the macOS screenshot shortcuts
⇧⌘3, ⇧⌘4 and ⇧⌘5 are also the macOS screenshot shortcuts. Change one of the two sets, so each shortcut has one function.
- To change the pxShot shortcuts, open pxShot Settings > Shortcuts. Click a shortcut and type the new one. The button with the cross removes a shortcut.
- To change the macOS shortcuts, open System Settings > Keyboard > Keyboard Shortcuts > Screenshots.
Keys during a selection
- SpaceDuring a drag, moves the selection. With no drag, changes between the area and the window.
- ShiftGives a square.
- OptionGrows the selection from its centre.
- CommandShows the crosshair lines.
- ControlAt the release, copies the screenshot.
- EscapeCancels.
Keys in All-In-One
- ReturnACaptures.
- FFullscreen.
- WWindow.
- SScrolling Capture.
- TSelf-Timer.
- ⌘CCaptures and copies.
- Arrow keysMove the selection.
Preview
After a capture, a preview of the screenshot shows at the bottom center of the screen, above the Dock. Several previews make one row, with the newest on the right.
- Drag the preview into an app to drop the file there.
- Copy copies the screenshot. The folder button shows the file in Finder.
- Annotate, or a double click, opens the editor.
- The text button copies the text of the screenshot.
- Open Hub opens the hub with the screenshot selected.
A bar at the bottom of the preview gets shorter until the preview closes. The bar stops while the pointer is on the preview. When the time ends, the preview moves to the menu bar icon. With Reduce Motion on, it fades.
The settings have the position, the time until the preview closes, and a switch for the preview.
Editor
The editor adds annotations to a screenshot. Open it with Annotate in the preview or in the hub.
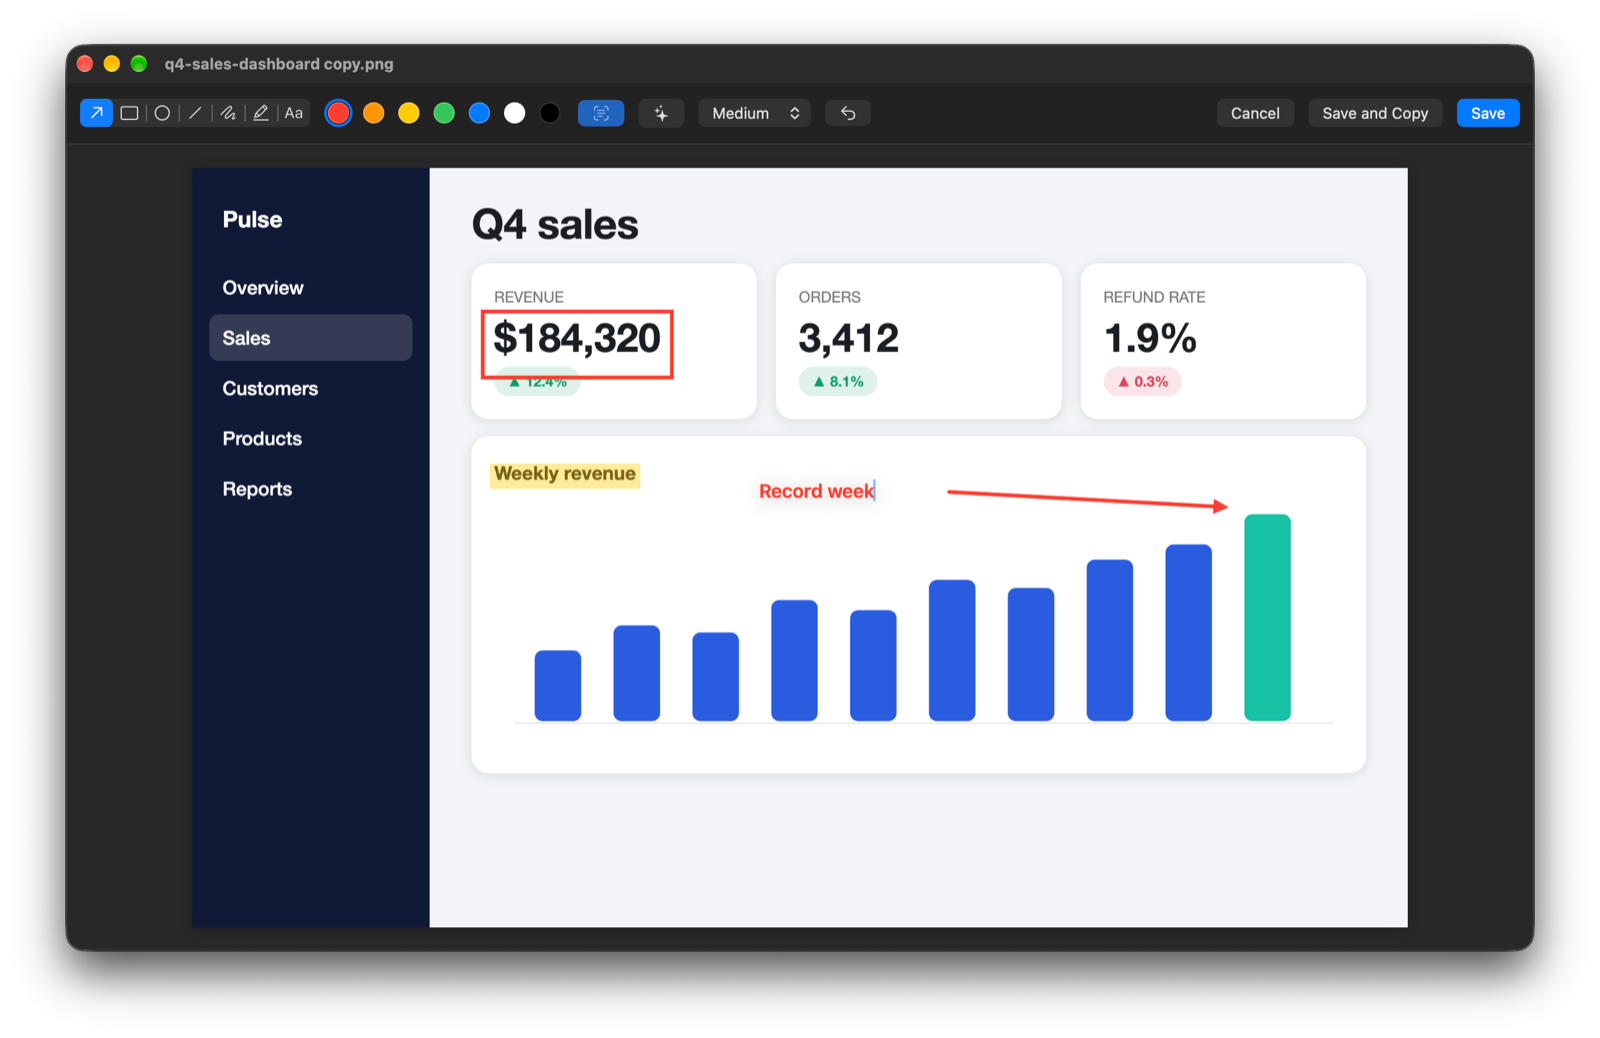
- The tools are an arrow, a rectangle, an ellipse, a line, a pen, a highlighter and text.
- Save writes the annotations to the file of the screenshot.
Snap to Text
The highlighter and the rectangle snap to the text. Click a line to mark the line. Drag across words to mark those words. The Snap to Text button stops the snap.
Highlight by description
The sparkles button highlights lines with the model on the Mac. Type what to highlight, for example "the error", or click Suggest. One Undo removes the marks of one request. This function needs macOS 26 or later with Apple Intelligence on.
Text and smart names
pxShot reads the text of each screenshot with text recognition on the Mac. The text and the index stay on the Mac. pxShot does not collect data.
- The search field of the hub finds a screenshot by the words in it.
- The text button in the preview and in the hub copies the text of a screenshot.
- pxShot watches the save folder. When you move, rename or delete a file there, the index and the hub change in approximately one second.
Smart names, kinds, tags and summaries
These functions need macOS 26 or later with Apple Intelligence on. The model runs on the Mac. On macOS 15, the other functions of pxShot operate.
- The model gives each screenshot a short name, a kind, tags and a one-sentence summary.
- The kinds are Error, Code, Chat, Receipt, Document, Web Page, Design, Data, Settings and Other.
- The model needs approximately 2 seconds for each screenshot. The first run on a large folder can take some time.
- The hub shows the count next to the search field. The pause button stops the run until you click it again or pxShot starts again.
- Rename to “…” in the hub gives the file its smart name. pxShot does not rename a file by itself.
Hub
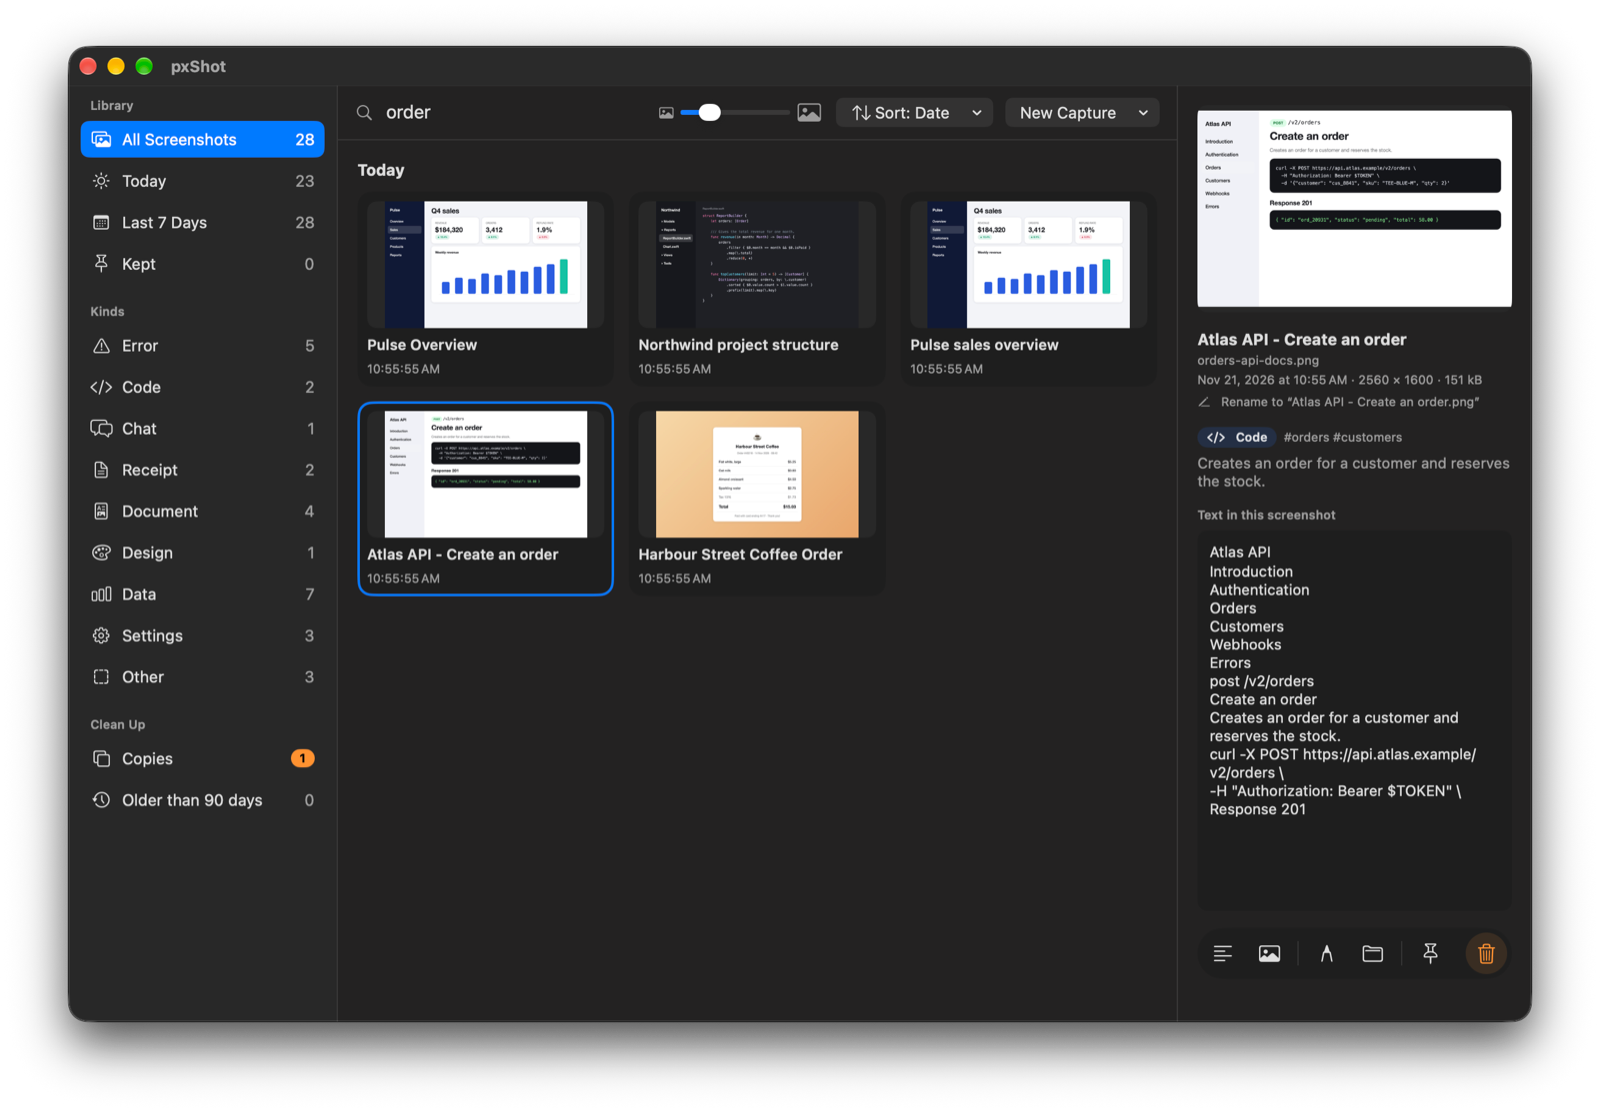
The hub is one window for all your screenshots. Open Hub… in the menu opens it. To open the hub from any app, record a shortcut for Open Hub in Settings > Shortcuts. There is no default shortcut.
Sections
- The sidebar has the sections All Screenshots, Today, Last 7 Days and Kept.
- The cleanup sections are Copies and Older than 90 days.
- The section Kinds groups the screenshots by what they show. Only the kinds that have screenshots show.
Search and sort
- The search field finds a screenshot by the words in it, by its file name, or by its smart name and tags. It searches the section that is open.
- The Sort menu sorts the grid by date, name, size or dimensions, in each direction. The sort by date shows one group for each day.
- The slider next to the search field changes the size of the thumbnails.
- pxShot keeps the sort and the size.
Selection
- Click a screenshot to see its text and its buttons: copy the text, copy the image, annotate, show in Finder, keep, and move to the Trash.
- Double-click a screenshot to open the file.
- Drag across the grid to select many screenshots. Hold Command during the drag to add to the selection.
- Command-click adds or removes one screenshot. Shift-click selects all the screenshots from the last selected screenshot.
- Click empty space to clear the selection.
- With many screenshots selected, Keep, Show in Finder and Move to Trash operate on all of them. Copy Text copies all their text.
- New Capture starts a capture mode. The hub hides during the capture.
Hub shortcuts
- ⌥⌘CCopies the text.
- ⇧⌘CCopies the image.
- ⌘EOpens the editor.
- ⌘RShows the file in Finder.
- ⌘KKeeps the screenshot.
- ⌘⌫Moves the file to the Trash. It does not operate while the search field has focus and text.
- ⌘ASelects all the screenshots of the section. When the search field has focus and text, it selects the text.
- EscapeClears the selection.
- Arrow keysMove the selection in the grid. With Shift, they extend the selection.
- SpaceOpens the selection in Quick Look.
- ReturnOpens the selection in its app.
- ⌘+⌘−Make the thumbnails larger or smaller.
Cleanup
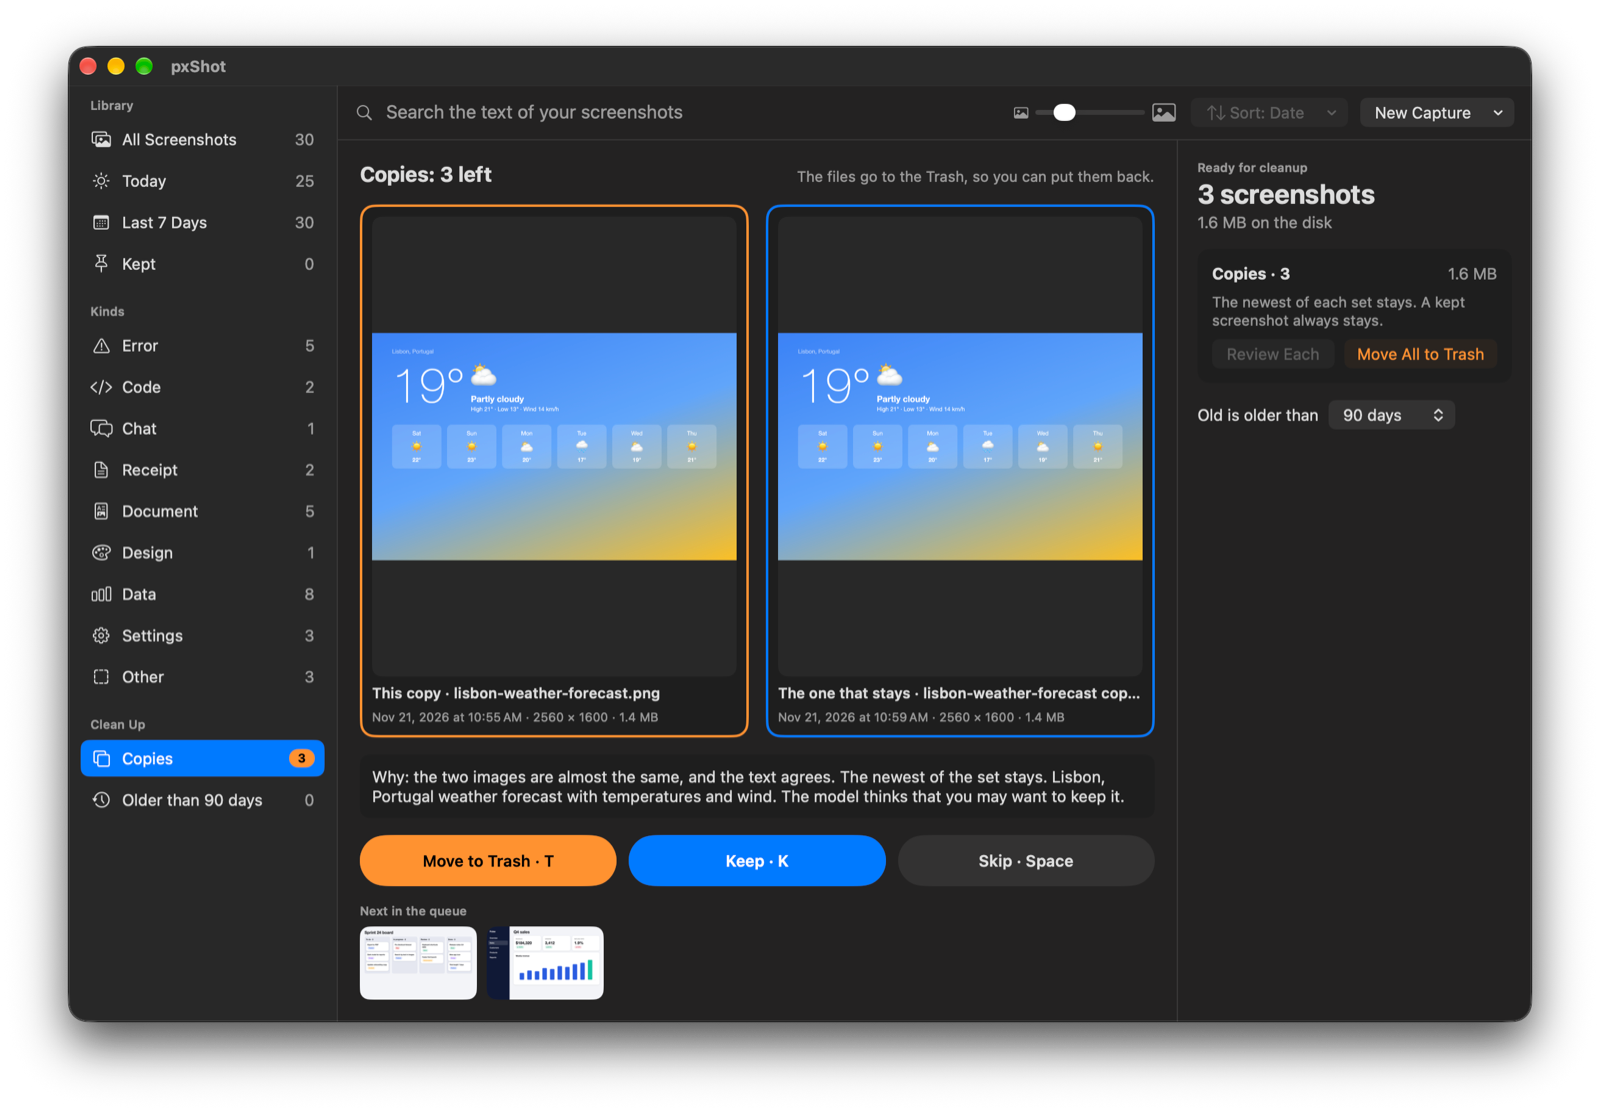
Clean Up Screenshots… in the menu opens the hub on the review. The review shows one screenshot at a time. You make each decision. pxShot does not move a file to the Trash by itself.
- TMoves the screenshot to the Trash.
- KKeeps the screenshot.
- SpaceSkips the screenshot.
Copies
Two screenshots are copies when the images are almost the same and the text agrees. The newest of each set stays. For a copy, the review shows the copy and the screenshot that stays, side by side.
Old screenshots
An old screenshot is older than 30, 90, 180 or 365 days. You select the age in the review.
Keep and Move All to Trash
- Keep pins a screenshot, so the cleanup does not suggest it again. The pin stays when you annotate or rename the file.
- Move All to Trash moves a full group when you click it.
- The reason under each screenshot gives the summary of the model and an advice: keep or move to the Trash. The advice is only text.
Settings
Settings… in the menu opens the settings. The window has the panes General, Capture, Shortcuts and About.
General
- Start pxShot at login
- Opens pxShot when you log in.
Capture: After Capture
- Copy to clipboard
- Copies each capture. The default is on.
- Clipboard content
- Image and File, Image, or File Path. With Image and File, an image app pastes the image, and a terminal or a text field pastes the file path.
- Play a sound
- Plays a sound at the capture.
Capture: Preview
- Show the preview
- Shows the preview after a capture.
- Position
- The bottom center or a corner of the screen.
- Close automatically
- Never, or after 5, 10 or 30 seconds. The default is 10 seconds.
Capture: Save
- Save to
- The save folder. The default is ~/Pictures/pxShot. Click Choose… to select a different folder.
- Format
- PNG, JPEG or HEIC. The default is PNG.
- File name
- Shows an example of the file name.
Capture: Screen
- Show the pointer in screenshots
- Puts the pointer in the screenshot.
- Scale Retina screenshots to 1x
- Saves the screenshot at 1x.
Capture: Capture Area
- Show the crosshair
- Never, While Command Is Down, or Always.
- Show the magnifier
- Shows a magnifier at the pointer.
- Freeze the screen
- The screen stays still during the selection, so you can capture content that moves.
Capture: Capture Window
- Add the window shadow
- Keeps the shadow of the window in the screenshot.
- Background
- Transparent, Desktop Wallpaper or Plain Colour. With a wallpaper or a colour, you can set the padding.
Capture: Self-Timer
- Interval
- 3, 5 or 10 seconds. The default is 5 seconds.
Shortcuts
- Capture and Hub
- One shortcut for each capture mode and one for Open Hub. A shortcut operates in all apps. It must have Command, Control or Option, or be a function key.
About
- Version, License and Status
- Shows the version and the state of the trial or the purchase.
Trial and purchase
pxShot has a 7-day free trial. After the trial, pxShot is a one-time purchase through the App Store. The App Store shows the price.
- To start the trial, click Start 7-Day Free Trial… in the menu. The window "Buy pxShot" opens. The trial gives all the features of pxShot.
- During the trial, the menu shows the days that remain.
- To buy, click Buy pxShot… in the window "Buy pxShot".
When the trial ends
Capture, the editor, the model run and cleanup are stopped. The hub stays open, so you can browse, search, copy and show your screenshots in Finder.
Restore Purchases
If you bought pxShot before, open the window "Buy pxShot" from the menu and click Restore Purchases. The App Store looks for your purchase of pxShot.
The License Agreement applies to your use of pxShot.
Mac App Store copy
These points apply to the copy of pxShot from the Mac App Store.
- pxShot runs in the App Sandbox.
- Scrolling Capture has no Auto-Scroll. You scroll the content, and pxShot makes one long image.
- Updates come from the App Store.
- The default save folder is ~/Pictures/pxShot. To use a different folder, select it with Choose… in Settings > Capture > Save.
Requirements and help
- pxShot requires macOS 15 or later.
- Smart names, kinds, tags, summaries and the highlight by description need macOS 26 or later with Apple Intelligence on.
- pxShot needs the Screen Recording permission. See Get started.